Getting Started with Google Tag Manager

Google Tag Manager has turned out to be one of the life savers for marketers to work with tags. Tagging your web pages increases the effectiveness of your analytics reports making them more precise. GTM has many features that help you in the entire tag management process and the best part is, it is completely free. In this blog, we try to help out people who want to get started with Google Tag Manager. We will be discussing how GTM works, its essential components, how to set up a GTM account and how to set up a tag.
Before we start with setting up a GTM account, let's take a look at some of the basic concepts on how GTM works.
How GTM works?
Google Tag Manager is basically a tool which allows you to manage your tags easily. Tags are nothing but fragments of code that needs to be inserted on webpages to fetch any information you are looking for. Before Google tag manager, you had to hard code these tags to your website’s code manually which is a tedious process. Google tag managers provide you with an easy to use web based user interface to set up these tags, rather than coding them manually each time. All you need to do is add the tracking code, called the container tag to your website or mobile app.
Basics of Google Tag Manager
The primary concepts you need to know in order to work with GTM are Tags, Containers, Trigger, Variables, and Data layer. Let’s explore how these concepts work together to configure and fire tags.
Tag: A tag is a code snippet that executes on a web page. Tags used in tag management systems are different from the ‘html tags’ developers use to code a web page. These tags which are used for digital marketing and analytics send some measurement information from your site to a third party such as Google Analytics. For example, you could create a tag to see how many people fill out a form on your “Contact us” page. This tag can then send information to Google Analytics, AdWords, or some other third parties.
Containers: A container is what ‘holds’ all your tags together. When you set up a GTM account, the first thing you have to do is create a container. Once you create a container you need to paste the GTM code in your web page’s source code. This code is called the container code. Once you add this code, you can add or edit tags as needed through Google Tag Manager.
Triggers: Each tag serves some specific purpose and to fire each tag, there has to be some ‘event’.Say, you might want a tag to send some information when someone clicks a particular link or on submitting a form. These events are called ‘Triggers’ and every tag should be assigned at least one trigger. There are different types of triggers available in tag manager like Click Trigger, Element visibility trigger, YouTube Video trigger, Form submission trigger and so on.
Triggers have two components- events and filters. Triggers cause the tags to get fired when the specified event (like click, form submission, etc) is detected. By default, triggers fire a tag on all events for the associated event type. Trigger filters can be used to further specify when a trigger has to be fired.
Variables: Variables are used in both triggers and tags. Variables in triggers are used to define filters that specify when a particular tag should fire and variables in tags are used to capture any dynamic values (say transaction value and products purchased in a conversion tracking tag). Tag manager provides a set of pre-defined variables needed for handling tag and trigger configurations. You can also create user defined variables as per your requirements.
Data Layer: A data layer is a JavaScript object which keeps information of your website that the tags need. It passes the information to your tag manager container. Data layers are optional. But GTM functions best when deployed with data layers. Implementing data layer with values and associated variables ensures they will be available as soon as you need them to fire your tags, rather than the tags spending time searching through the HTML to find the information they need.
Creating a GTM account
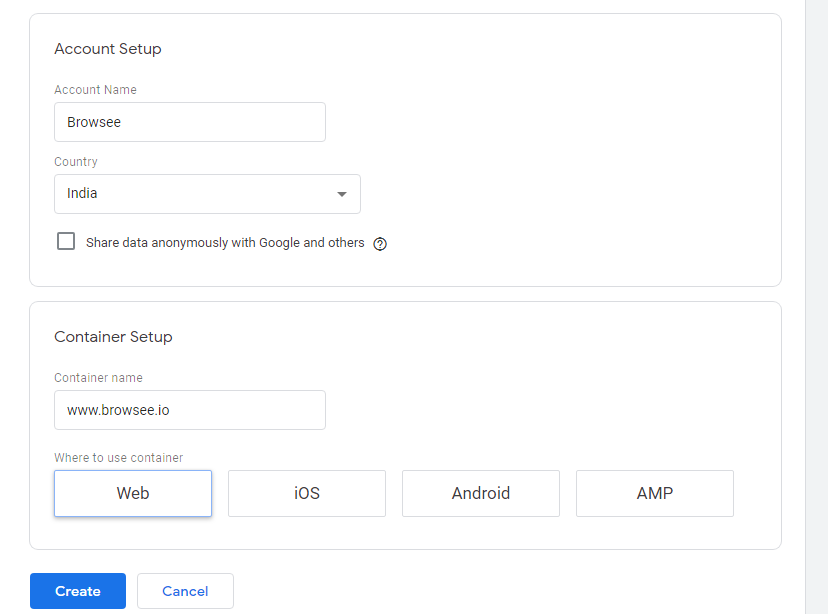
Go to https://tagmanager.google.com and create an account. Under “SetUp Account”, enter the name of your company and hit ‘Continue’.Enter your domain name as the Container name.Choose which type of page or app it will be used on.
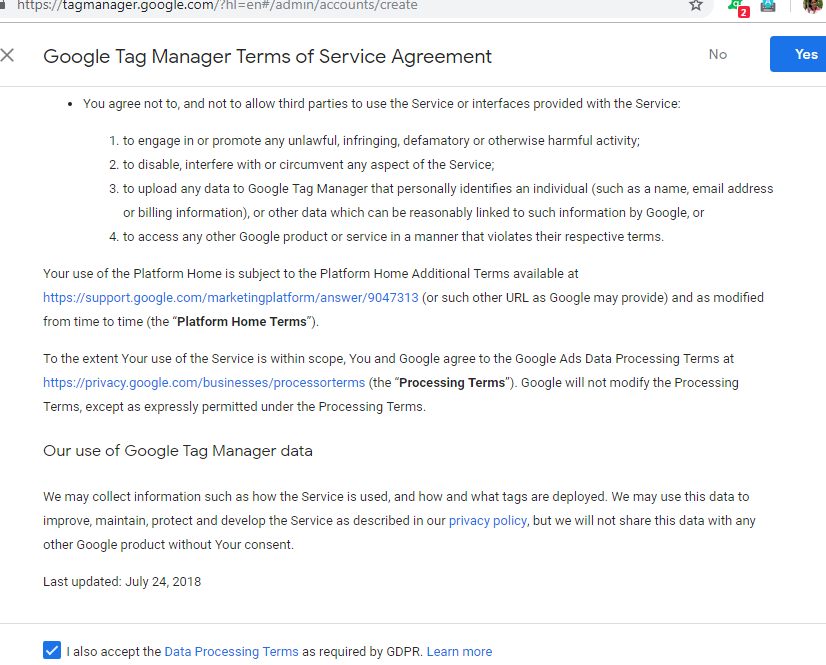
Once you create your container, accept the GTM terms of service.
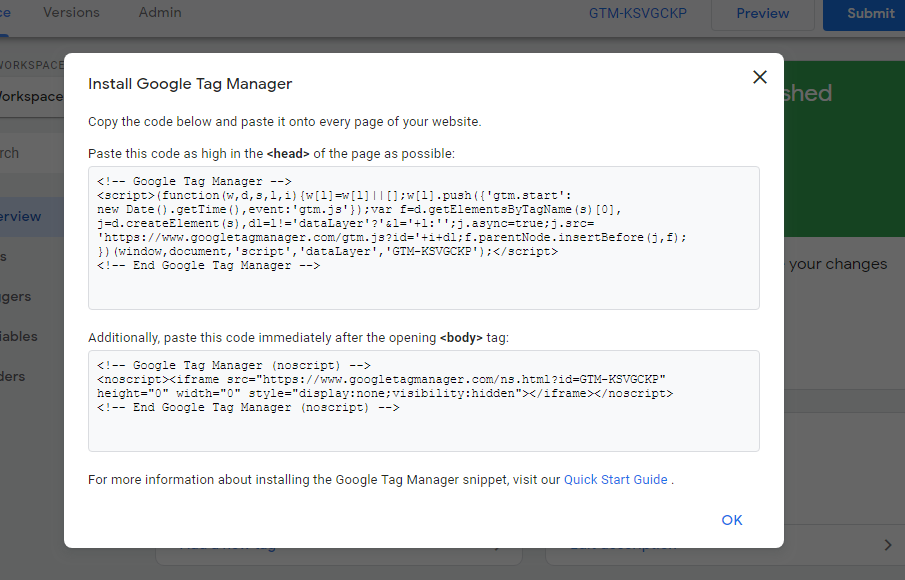
Now you will be given the container code, which you need to paste on your site’s source code.
Pro Tip before getting started with tag management: Create one tag manager account for an organization. Multiple containers can be managed within a single GTM account if required.Create one container per web domain.Have an analytics plan and tag implementation plan before you start with the tag manager. Consider what tags you will need and where to deploy them. Though GTM allows you to have any number of tags without any limitations, Google advises to the number of tags to a minimum.
Creating a Tag
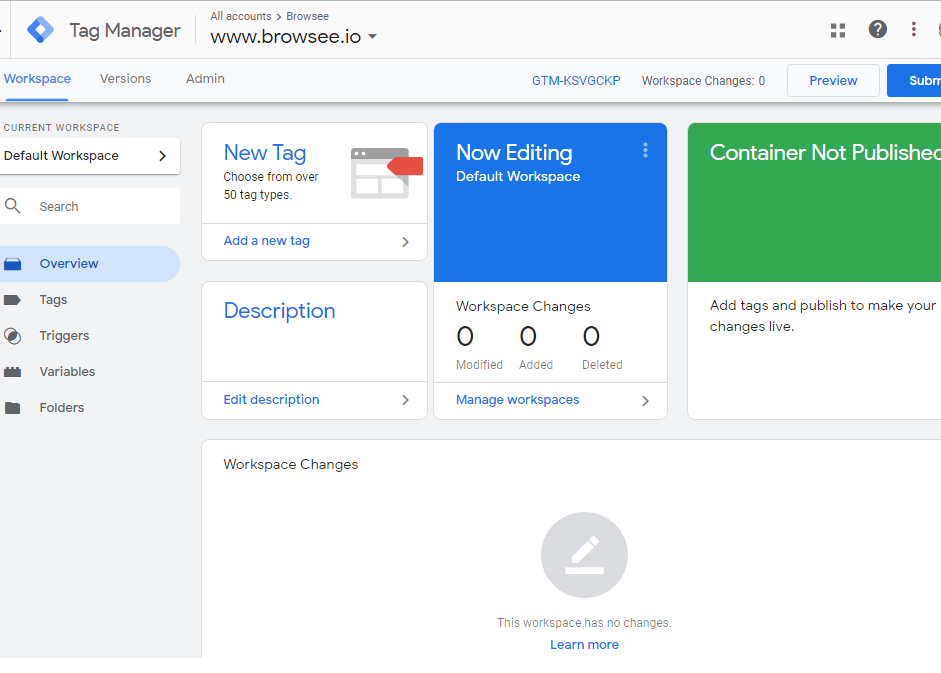
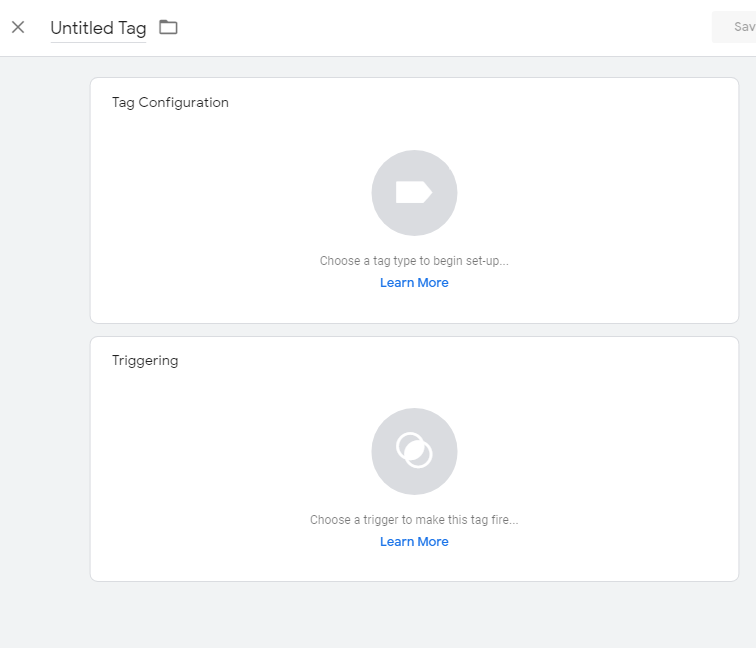
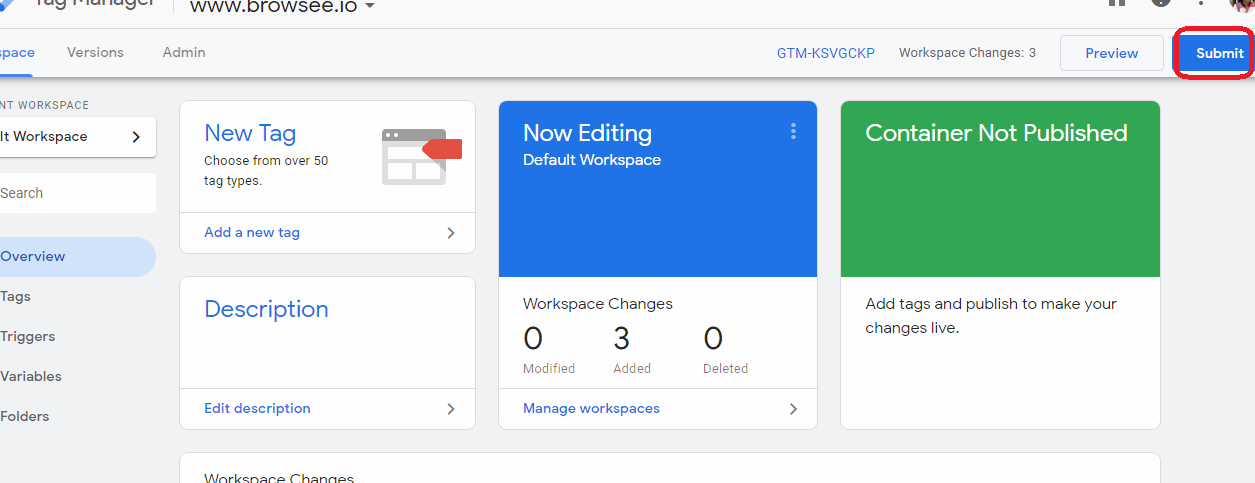
Once you create your container, you can go ahead with creating tags. Once a container is created your dashboard look as shown below.
Now, follow the below steps to add a tag.
1) Click ‘Add a new tag’ under ‘New Tag’. You get the below window now.
2) In Tag Configuration, choose a tag which you want to add. There is a long list of tag templates, which includes most of the commonly used tags.

If you don't see the tag you are looking for, Choose “Custom HTML” to add your code.
3) The tag configuration set up varies for each tag and depends on the tag you select. As an example, here we show you how a Google Analytics page view tag can be added. For this, I select Google Analytics tag and I get the window below.
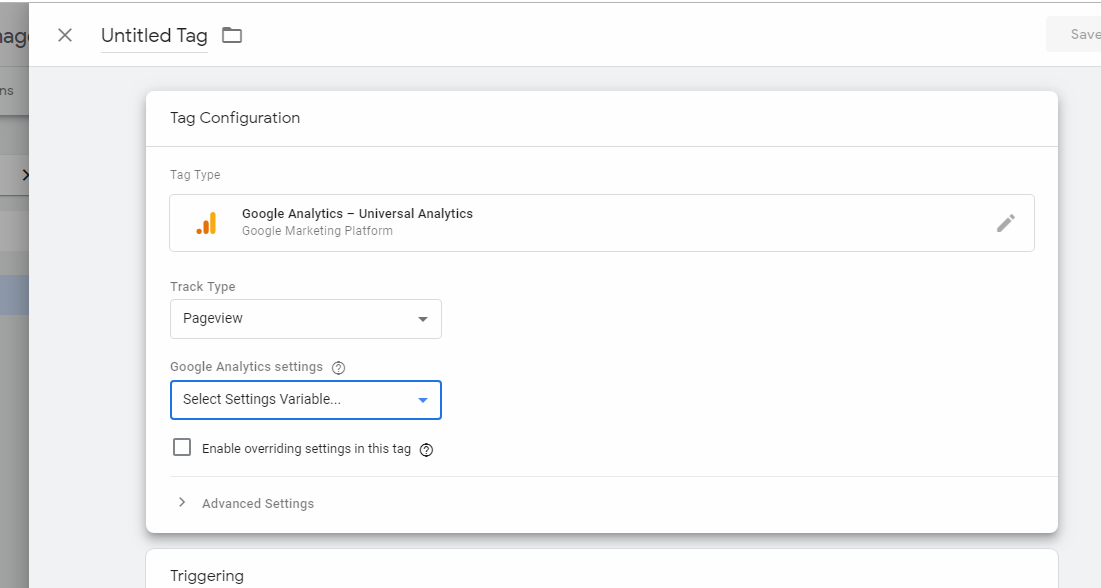
Now, select ‘Page View” for “Track Type” and under ‘Google Analytics Settings enter the variable with your google analytics settings account information.If you haven't created the variable already, you could create one by clicking “New Variable”.

Once your tag has been configured, save it.
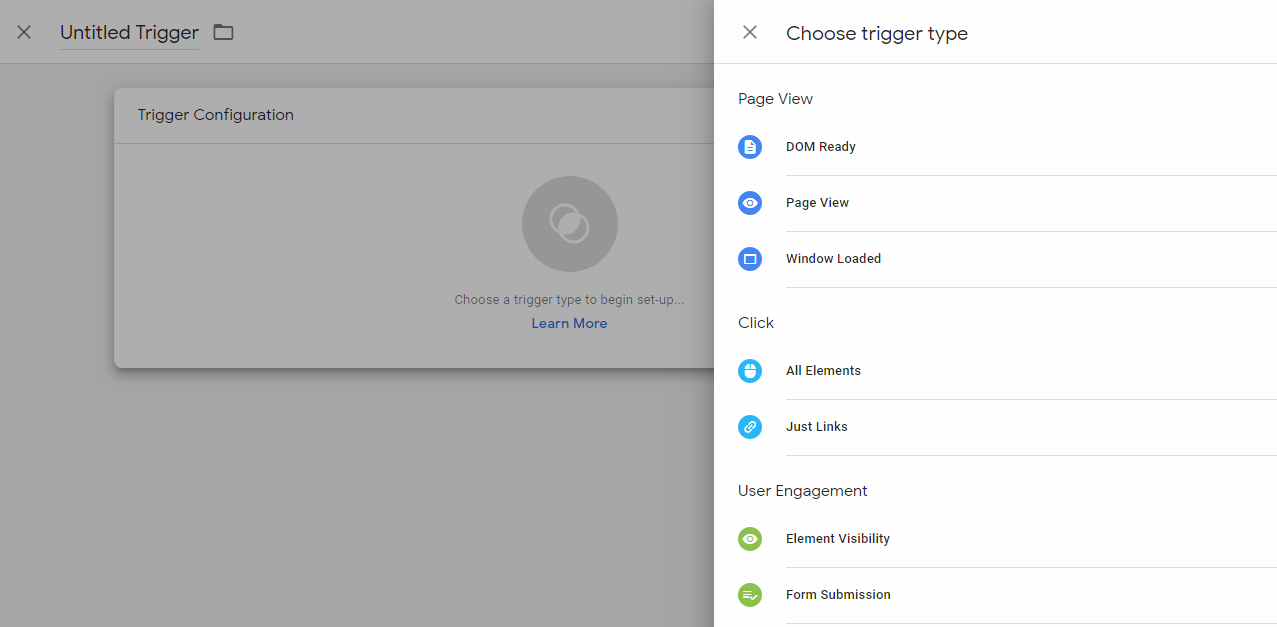
4) Next step is to create a trigger. You need to create at least one trigger for a tag. Select trigger Configuration and Select Trigger type. Then you can configure it.
5) Here, I select Page Views and it opens up the configuration window for ‘Page View’ trigger. I select ‘Some pages' as I want the trigger only for a particular page, say contact us page and I give the page URL in the condition.
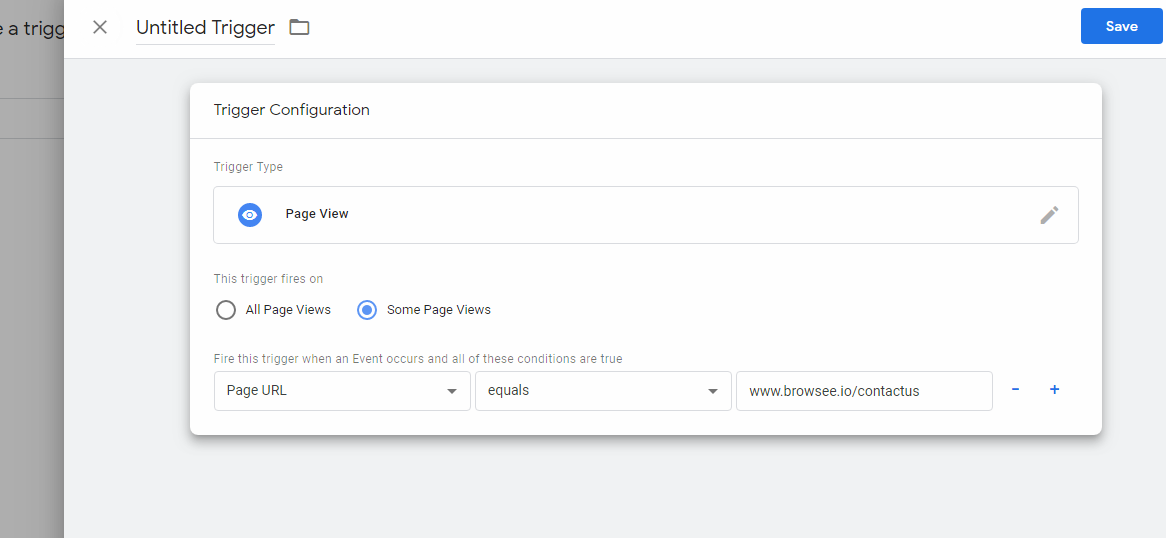
Once your trigger has been configured, save it.
Pro Tips while creating a tag:
Name your tags clearly to avoid confusions and help distinguish each tag. Google recommends a tag naming convention which goes like ‘Type-Detail-Location’. For example ‘GA-Form Submission-Contact Us’ represents Google analytics tags tracking form submission on your Contact Us page.
Woo! You have created your first tag successfully in GTM! Now you have to let it go live. But it's always good to double check before you go live! Right?That's why you have Preview and Debug mode in GTM.
Preview, Debug and Publish tags in GTM.
Preview mode in GTM enables you to test all your tag manager configurations on your site to make sure everything works as expected. To enter ‘Preview & Debug’ mode, click the “Preview” button in the upper right corner of GTM dashboard.

Once Preview mode is enabled, an orange banner is displayed on your work space overview page to indicate you are in ‘Preview’ mode. Open your website where the container is implemented, and then you can see a debug console window at the bottom of your browser which shows detailed information about your tags, including how tags are fired and what data is being processed.
The information in Debug mode can be used to find out if tags fire properly and what data they pass on. As you click through the website, the debug console will keep on updating information about how tags are fired. The top navigation bar lists all your tags, variables and data layers and the left navigation bar shows the list of events that occur in the data layer.
Once you are confident that all your tags are firing correctly, you can publish them. For this, you just need to click the ‘Submit’ button on the right corner of your dashboard.
You will be asked to review your changes and you have to enter a name and description for your container version and publish it. Every time, you publish changes in tag manager, it creates a new version of your container.You can revert to an earlier version anytime by clicking “Versions” button at the top of the GTM dashboard, choose the version you want, click “Action”, then “Publish”.
Well, that was just kick starting GTM. Just an introduction to the tool and how to get started with using it. There is a hell lo you can do with Google tag manager. Learning how to use it in depth can be pretty overwhelming. But it is pretty easy to catch up if you refer to the right material and put in some effort. Google itself has a lot of information in its Tag Manager helphttps://support.google.com/tagmanager. There are other resources as well including Youtube videos. Simoahava is a great blog which focuses mainly on Google analytics and tag manager topics. There are a number of helpful articles on tag manager covering most of the topics and things that can be done in GTM. .
How much is a great User Experience worth to you?
Browsee helps you understand your user's behaviour on your site. It's the next best thing to talking to them.

