Redux Devtools - How To Use, Getting Started
Redux is an open-source JavaScript library that manages and centralizes an app's state and is typically used with Angular and React. When mixed with Angular and React, it has built user interfaces, much like Facebook's Flux structure.

One of its quality-acknowledged functions is the Devtools, which gives a debugging platform for packages made with the help of the Redux toolkit.
What is Redux DevTools?
Redux DevTools is a development time package that adds extra functionality to the Redux development workflow. The principal focus is to keep in mind the code stripping while going through production. To provide a fantastic UI to carry out the development method easily, you must choose a React component before using Redux DevTools. The blend of UI is enormously centric because distinct applications use one-of-a-kind UIs. Thus, Redux DevTools is constructed to keep this concept flexible so that developers can handle this part.
Another critical aspect to remember is to have a “display” based on React aspect. We would remarkably suggest the usage of LogMonitor to look at state and time, after which you can wrap it up into a DockMonitor to transport it throughout the display screen quickly. This makes the development via Redux even less complicated hence the name DevTool.
Redux DevTools Features
- Allows you to look at every payload for action and status
- You can “cancel” moves going back in time
- If the gearbox code is changed, every movement will be evaluated again “in stages.”
- If the reducers release, then the error and the motion wherein it happened can be recognized.
- With the persistState () store enhancer, you could keep debugging sessions on web page reloads.
What is the Redux DevTool extension?
DevTool is a Chrome-based extension that provides a console to set up our development environment with Redux. This extension helps visualize the movements and state modifications in Redux-based software. We will recognize this by putting its extension for pattern software in place. It is quite simple to install this extension using Google Chrome. See the steps below to feature this extension in the browser.
Environment Setup Methods
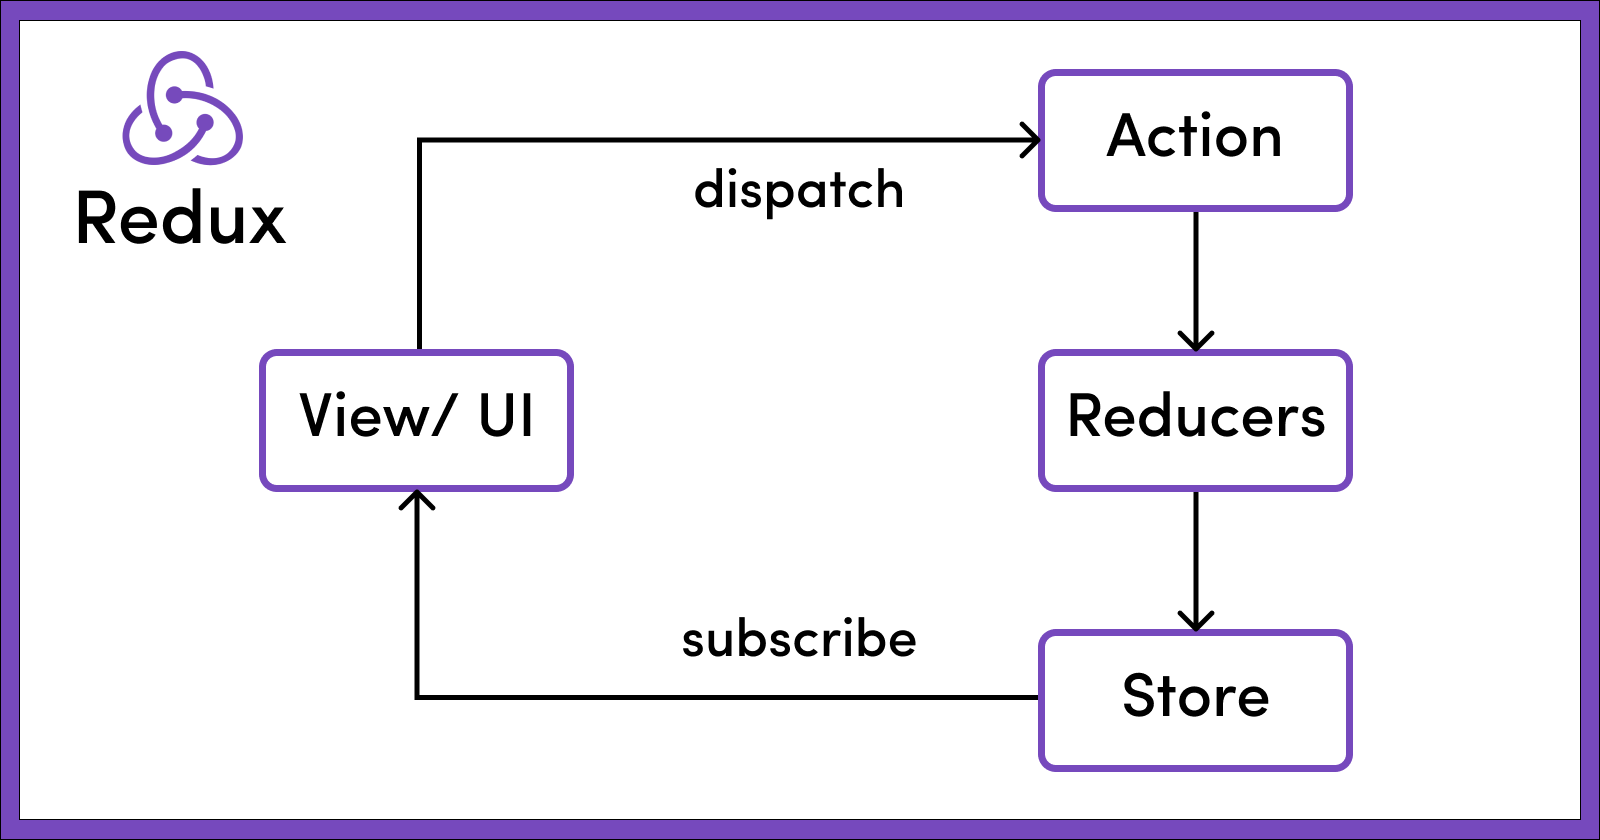
Workflow
We will install the Redux DevTools for a simple project to better understand the workflow and how things will operate. The steps contain:
- Adding the Redux DevTools extension to our browser.
- Installing Redux DevTools dependencies and including Redux DevTools to store.
- Making the stores and actions in the Redux DevTools Console visible.
Adding Extension
Download and install Redux DevTools from the browser. Add the extension to the browser, as proven below. We can see the icon in the top right corner of the browser after adding the extension.
Installing DevTools dependencies
To install the dependencies of Redux DevTools, we only need to look for a few instructions in our system. The following commands can be used to satisfy the development dependencies.
npm install --save-dev-devtools-extension
After this step, we should be uploading the compose capability from Redux DevTools using
import { composeWithDevTools } from 'redux-devtools-extension';
The next step is to create a store by using this compose technique as proven under
const store = createStore(rootReducer, composeWithDevTools( ));
Or
import { composeWithDevTools } from 'redux-devtools-extension';
const store = createStore(reducer, composeWithDevTools(
applyMiddleware(...middleware),
// other store enhancers if any
));
The principal objective of installing those dependencies is to probe inside our shop and consider the states and actions. It may be called an extra diagnostic device where we see what is occurring. The code snippet that represents a store with the Redux DevTools extension provides an additional method of creating a store.
//index.js (Simple store + Redux DevTools set up)

import React from "react";
import { render } from "react-dom";
import { Provider } from "react-redux";
import App from "./components/App";
import rootReducer from "./reducers";
import { createStore } from "redux";
import { composeWithDevTools } from "redux-devtools-extension";

const store = createStore(
rootReducer,
composeWithDevTools()
// other store enhancers if any
);

render(
<Provider store={store}>
<App />
</Provider>,
document.getElementById("root")
);
After this step, let's install middleware because middleware in Redux toolkit makes it feasible to apply asynchronous community calls and hold the update hence. In the subsequent instance, we can see how a store in middleware appears and the way to set up DevTools for the same. Thus, in the instance beneath, we might use the Redux-promise middleware. The code snippet and command for it are.
npm install --save-dev-devtools-extension
All promise-based middleware is installed to the Redux by the command.
import React from 'react'
import ReactDOM from "react-dom";
import { Provider } from 'react-redux'
import { createStore, applyMiddleware } from "redux";
import ReduxPromise from "redux-promise";
import rootReducer from './reducers'
import App from './components/App'
//setting up store with middleware and redux dev tools viewers

const store = createStore(rootReducer,
applyMiddleware(ReduxPromise));

ReactDOM.render(
<Provider store={store}>
<App />
</Provider>,

document.getElementById("root") );
How to use Redux DevTools
Tracing actions
Another great feature of Redux DevTools is the call stack that has prompted the movement. We can pick any action from the records and notice the purpose of the movement.
For large-scale applications where the same movements are triggered simultaneously from one-of-a-kind elements of apps, it's far more challenging to get to the foundation motive of action dispatch. Developers can use the trace feature in this situation.
Developers can define custom implementations with Redux DevTool or use the default implementation based on Error.Stack(). Here is the API to allow trace:
window.__REDUX_DEVTOOLS_EXTENSION_COMPOSE__({
trace: true, // (action) => { return ‘trace as string’; }
traceLimit: 25,
})
As seen, the trace argument also accepts methods. This method is called with every action. Developers can upload custom implementation here to see the purpose of action dispatch. Passing this method in opposition to hint assets allows developers to monitor the hint of favored actions best.
This can help keep the improvement experience clean and performant, as growing hints for each motion may devour a lot of reminiscences. The approach as trace can be helpful for movement dispatched via aspect effect libraries like redux-saga or different occasion listeners.
When not implementing a custom trace technique, developers can rely upon default implementation that uses Error.Stack() API. In this case, the traceLimit property helps manage the memory utilization of DevTool. It overrides browser defaults of Error.StackTraceLimit restricts the duration of the stack for optimized memory consumption.
Tracing actions in the editors
Extending the potential to show trace of action, Redux DevTool permits you to navigate to the precise factor of the codebase. For massive codebases, this can be first-rate accessible, as it saves lots of beneficial time to navigate to the precise area in a massive codebase. The editor may be set from extension settings at the bottom right of the DevTool.
Skipping actions
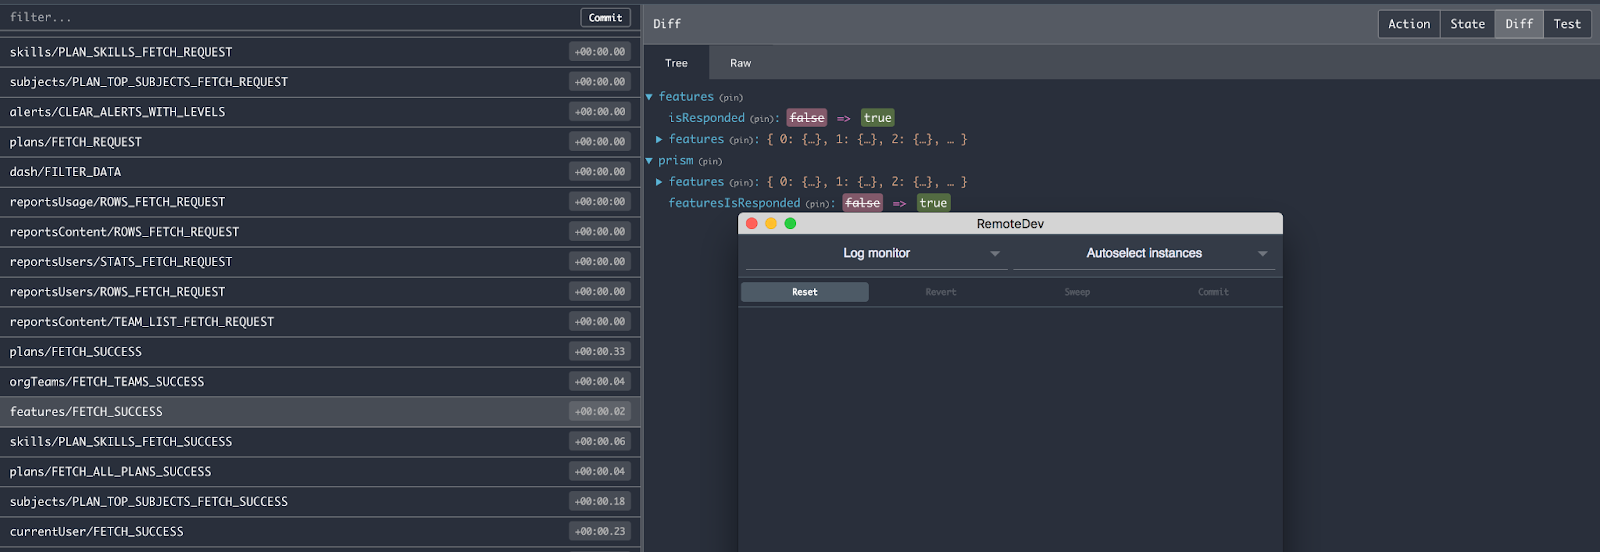
Time travel is one of the compelling features of Redux DevTools; it allows us to see how our app’s state has reached the contemporary factor. In certain instances, we would need to remove a selected motion from the timeline to examine app behavior. This is not viable in the time travel mechanism. Redux DevTool has an extraordinary manner of doing it. Out of 3 one-of-a-kind view kinds to your utility’s waft, log monitor and inspector permits you to disable or dispose of a movement from the timeline.
Jumping to action
Besides skipping state from the timeline, developers can jump to whatever state they want while not having to transport through the timeline. This allows developers to quickly move around and see the app’s output on one-of-a-kind intermediary states. Developers can monitor the effect of jumps within the timeline as well. This function is the handiest to be had with inspector mode.
Custom dispatch
Redux DevTool allows us to dispatch movements without writing any code. We can upload our actions in the dispatcher, which works like an action dispatched through the Redux toolkit API. This kind of mocking enables testing side effects and based actions. This function is only handy while coupled with locking to the cutting-edge state. We can lock the state to a sure level and dispatch action from DevTool to see the effect on the store and reveal side results.
Allow/block movements
We will screen only the most favored moves for massive-scale applications along with some of the actions; alternatively, we ought to block positive movements from acting inside the DevTools. This can be done by initializing it in our applications or adding a list of moves to the DevTools settings to either block or allow.
window.__REDUX_DEVTOOLS_EXTENSION_COMPOSE__({
actionsBlacklist: 'SOME_ACTION',
// or actionsBlacklist: ['SOME_ACTION', 'SOME_OTHER_ACTION']
// or just actionsBlacklist: 'SOME_' to omit both
})
As can be seen, either through settings or at initialization, we will use the actionsBlacklist/actionsWhitelist parameters in an argument.
Persist store on web page reload
One of the pain points in large-scale applications is the improvement of interfaces for the state. This is derived after going through the app. It becomes even more challenging when some states rely upon side consequences, for instance, community responses. DevTool comes to the rescue; we can persist in sure states of ours across web page reloads. This will help you jump immediately to the desired state after reloading without going through the adventure again. This may be executed via clicking the “Persist” button in the bottom bar or adding ?Debug_session= to the URL.
Using in manufacturing
It may be very difficult to expect or seize all feasible bugs in our apps. We often stumble upon some issues after our applications were live in production and used by many customers. To investigate those insects, we'd want to see the path of actions or the current state of our software while the problem occurred. DevTool permits us to see a trail of moves and keep them in production properly, making it less complicated to breed troubles. For protection and overall performance, it's highly encouraged to apply action and state sanitization options.
Locking to the current state
In packages where numerous moves are dispatched frequently, we'd need to investigate our software at an intermediate level without permitting similar actions to be dispatched. This may be completed by locking our app to the cutting-edge state. Unlike pausing, this freezes our software to its current state. When the software is locked, we can still travel time and other allow/disable dispatched actions. The different gain of locking is that we ultimately have a method to avoid facet outcomes.
Commit moves
For huge-scale applications, it's by far not easy to go through the list of hundreds of actions. Rather developers prefer to display the utility in chunks. Redux DevTool permits developers to commit the contemporary set of actions for such instances. The current state is then considered the preliminary state for upcoming moves. One of the nice uses of this option is monitoring the state throughout web page transitions.
Once committed, you can additionally revert to this state every time. In other words, you can add a pivot to your state and return to it whenever required. Developers can dedicate state from Inspector mode; however, to Revert must switch to log monitor.
Conclusion
Undoubtedly, Redux DevTool is one of the most useful and effective tools for debugging React packages. It permits developers to leverage the predictability of software furnished using the Redux toolkit to the overall volume. It is likewise to be had within the React Native debugger; that's why understanding it in its entirety can simultaneously pace up our development and debugging on the internet and mobile platforms.
How much is a great User Experience worth to you?
Browsee helps you understand your user's behaviour on your site. It's the next best thing to talking to them.

